
从人脸检测到舵机开门,一块 K230D 开发板跑通智能门禁
项目介绍
基于正点原子 K230D BOX 开发套件,实现智能门禁系统的项目设计。
准备工作:硬件连接、舵机驱动、固件更新;
人脸识别:人脸注册、人脸识别的测试代码与效果演示;
智能门禁设计:流程图、代码、效果演示。
准备工作
硬件介绍、开发环境搭建、工程测试详见:【K230D人工智能开发板试用】介绍、环境搭建、工程测试。
在此基础上,安装驱动、进入Boot 模式、更新固件。
硬件连接
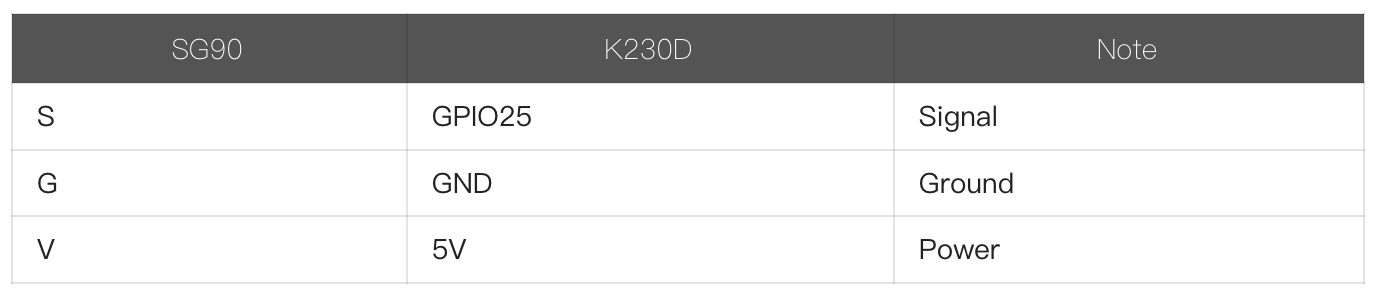
使用杜邦线连接 SG90 舵机和 K230D 开发板;
实物图
舵机驱动
舵机驱动舵机又叫伺服电机,是一个可以旋转特定角度的电机。常见舵机包括 90度、180度、360度等,这里使用 360 度转角的舵机。
360°舵机的控制一般需要一个20ms左右的时基脉冲,该脉冲的高电平部分一般为 0.5ms-2.5ms 范围内的角度控制脉冲部分,总间隔为2ms。以 360 度角度伺服为例,在 MicroPython 编程对应的控制关系是从 -90° 至 90°,示意图:
由原理图可知,板载 IO0 引脚对应 GPIO25;
由主控 MCU 引脚定义可知,GPIO25 对应 PWM5 资源,该引脚可用于驱动 SG90 舵机。
人脸注册
将目标人物照片保存至 CanMV 盘 \sdcard\examples\utils\db_img\ 目录;
运行人脸注册程序,对 db_img 文件夹包含的所有人脸图片进行特征值提取;
from libs.PipeLine import PipeLine, ScopedTiming
from libs.AIBase import AIBase
from libs.AI2D import Ai2d
import os
import ujson
from media.media import *
from media.sensor import *
from time import *
import nncase_runtime as nn
import ulab.numpy as np
import time
import image
import aidemo
import random
import gc
import sys
import math

# 自定义人脸检测任务类
class FaceDetApp(AIBase):
    def __init__(self,kmodel_path,model_input_size,anchors,confidence_threshold=0.25,nms_threshold=0.3,rgb888p_size=[1280,720],display_size=[1920,1080],debug_mode=0):
        super().__init__(kmodel_path,model_input_size,rgb888p_size,debug_mode)
        # kmodel路径
        self.kmodel_path=kmodel_path
        # 检测模型输入分辨率
        self.model_input_size=model_input_size
        # 置信度阈值
        self.confidence_threshold=confidence_threshold
        # nms阈值
        self.nms_threshold=nms_threshold
        self.anchors=anchors
        # sensor给到AI的图像分辨率,宽16字节对齐
        self.rgb888p_size=[ALIGN_UP(rgb888p_size[0],16),rgb888p_size[1]]
        # 视频输出VO分辨率,宽16字节对齐
        self.display_size=[ALIGN_UP(display_size[0],16),display_size[1]]
        # debug模式
        self.debug_mode=debug_mode
        # 实例化Ai2d,用于实现模型预处理
        self.ai2d=Ai2d(debug_mode)
        # 设置Ai2d的输入输出格式和类型
        self.ai2d.set_ai2d_dtype(nn.ai2d_format.NCHW_FMT,nn.ai2d_format.NCHW_FMT,np.uint8, np.uint8)
        self.image_size=[]

    # 配置预处理操作,这里使用了pad和resize,Ai2d支持crop/shift/pad/resize/affine,具体代码请打开/sdcard/app/libs/AI2D.py查看
    def config_preprocess(self,input_image_size=None):
        with ScopedTiming("set preprocess config",self.debug_mode > 0):
            # 初始化ai2d预处理配置,默认为sensor给到AI的尺寸,可以通过设置input_image_size自行修改输入尺寸
            ai2d_input_size=input_image_size if input_image_size else self.rgb888p_size
            self.image_size=[input_image_size[1],input_image_size[0]]
            # 计算padding参数,并设置padding预处理
            self.ai2d.pad(self.get_pad_param(ai2d_input_size), 0, [104,117,123])
            # 设置resize预处理
            self.ai2d.resize(nn.interp_method.tf_bilinear, nn.interp_mode.half_pixel)
            # 构建预处理流程,参数为预处理输入tensor的shape和预处理输出的tensor的shape
            self.ai2d.build([1,3,ai2d_input_size[1],ai2d_input_size[0]],[1,3,self.model_input_size[1],self.model_input_size[0]])

    # 自定义后处理,results是模型输出的array列表,这里使用了aidemo库的face_det_post_process接口
    def postprocess(self,results):
        with ScopedTiming("postprocess",self.debug_mode > 0):
            res = aidemo.face_det_post_process(self.confidence_threshold,self.nms_threshold,self.model_input_size[0],self.anchors,self.image_size,results)
            if len(res)==0:
                return res
            else:
                return res[0],res[1]

    def get_pad_param(self,image_input_size):
        dst_w = self.model_input_size[0]
        dst_h = self.model_input_size[1]
        # 计算最小的缩放比例,等比例缩放
        ratio_w = dst_w / image_input_size[0]
        ratio_h = dst_h / image_input_size[1]
        if ratio_w < ratio_h:
            ratio = ratio_w
        else:
            ratio = ratio_h
        new_w = (int)(ratio * image_input_size[0])
        new_h = (int)(ratio * image_input_size[1])
        dw = (dst_w - new_w) / 2
        dh = (dst_h - new_h) / 2
        top = (int)(round(0))
        bottom = (int)(round(dh * 2 + 0.1))
        left = (int)(round(0))
        right = (int)(round(dw * 2 - 0.1))
        return [0,0,0,0,top, bottom, left, right]

# 自定义人脸注册任务类
class FaceRegistrationApp(AIBase):
    def __init__(self,kmodel_path,model_input_size,rgb888p_size=[1920,1080],display_size=[1920,1080],debug_mode=0):
        super().__init__(kmodel_path,model_input_size,rgb888p_size,debug_mode)
        # kmodel路径
        self.kmodel_path=kmodel_path
        # 人脸注册模型输入分辨率
        self.model_input_size=model_input_size
        # sensor给到AI的图像分辨率,宽16字节对齐
        self.rgb888p_size=[ALIGN_UP(rgb888p_size[0],16),rgb888p_size[1]]
        # 视频输出VO分辨率,宽16字节对齐
        self.display_size=[ALIGN_UP(display_size[0],16),display_size[1]]
        # debug模式
        self.debug_mode=debug_mode
        # 标准5官
        self.umeyama_args_112 = [
            38.2946 , 51.6963 ,
            73.5318 , 51.5014 ,
            56.0252 , 71.7366 ,
            41.5493 , 92.3655 ,
            70.7299 , 92.2041
        ]
        self.ai2d=Ai2d(debug_mode)
        self.ai2d.set_ai2d_dtype(nn.ai2d_format.NCHW_FMT,nn.ai2d_format.NCHW_FMT,np.uint8, np.uint8)

    # 配置预处理操作,这里使用了affine,Ai2d支持crop/shift/pad/resize/affine,具体代码请打开/sdcard/app/libs/AI2D.py查看
    def config_preprocess(self,landm,input_image_size=None):
        with ScopedTiming("set preprocess config",self.debug_mode > 0):
            ai2d_input_size=input_image_size if input_image_size else self.rgb888p_size
            # 计算affine矩阵,并设置仿射变换预处理
            affine_matrix = self.get_affine_matrix(landm)
            self.ai2d.affine(nn.interp_method.cv2_bilinear,0, 0, 127, 1,affine_matrix)
            # 构建预处理流程,参数为预处理输入tensor的shape和预处理输出的tensor的shape
            self.ai2d.build([1,3,ai2d_input_size[1],ai2d_input_size[0]],[1,3,self.model_input_size[1],self.model_input_size[0]])

    # 自定义后处理
    def postprocess(self,results):
        with ScopedTiming("postprocess",self.debug_mode > 0):
            return results[0][0]

    def svd22(self,a):
        # svd
        s = [0.0, 0.0]
        u = [0.0, 0.0, 0.0, 0.0]
        v = [0.0, 0.0, 0.0, 0.0]
        s[0] = (math.sqrt((a[0] - a[3]) ** 2 + (a[1] + a[2]) ** 2) + math.sqrt((a[0] + a[3]) ** 2 + (a[1] - a[2]) ** 2)) / 2
        s[1] = abs(s[0] - math.sqrt((a[0] - a[3]) ** 2 + (a[1] + a[2]) ** 2))
        v[2] = math.sin((math.atan2(2 * (a[0] * a[1] + a[2] * a[3]), a[0] ** 2 - a[1] ** 2 + a[2] ** 2 - a[3] ** 2)) / 2) if \
        s[0] > s[1] else 0
        v[0] = math.sqrt(1 - v[2] ** 2)
        v[1] = -v[2]
        v[3] = v[0]
        u[0] = -(a[0] * v[0] + a[1] * v[2]) / s[0] if s[0] != 0 else 1
        u[2] = -(a[2] * v[0] + a[3] * v[2]) / s[0] if s[0] != 0 else 0
        u[1] = (a[0] * v[1] + a[1] * v[3]) / s[1] if s[1] != 0 else -u[2]
        u[3] = (a[2] * v[1] + a[3] * v[3]) / s[1] if s[1] != 0 else u[0]
        v[0] = -v[0]
        v[2] = -v[2]
        return u, s, v

    def image_umeyama_112(self,src):
        # 使用Umeyama算法计算仿射变换矩阵
        SRC_NUM = 5
        SRC_DIM = 2
        src_mean = [0.0, 0.0]
        dst_mean = [0.0, 0.0]
        for i in range(0,SRC_NUM * 2,2):
            src_mean[0] += src[i]
            src_mean[1] += src[i + 1]
            dst_mean[0] += self.umeyama_args_112[i]
            dst_mean[1] += self.umeyama_args_112[i + 1]
        src_mean[0] /= SRC_NUM
        src_mean[1] /= SRC_NUM
        dst_mean[0] /= SRC_NUM
        dst_mean[1] /= SRC_NUM
        src_demean = [[0.0, 0.0] for _ in range(SRC_NUM)]
        dst_demean = [[0.0, 0.0] for _ in range(SRC_NUM)]
        for i in range(SRC_NUM):
            src_demean[i][0] = src[2 * i] - src_mean[0]
            src_demean[i][1] = src[2 * i + 1] - src_mean[1]
            dst_demean[i][0] = self.umeyama_args_112[2 * i] - dst_mean[0]
            dst_demean[i][1] = self.umeyama_args_112[2 * i + 1] - dst_mean[1]
        A = [[0.0, 0.0], [0.0, 0.0]]
        for i in range(SRC_DIM):
            for k in range(SRC_DIM):
                for j in range(SRC_NUM):
                    A[i][k] += dst_demean[j][i] * src_demean[j][k]
                A[i][k] /= SRC_NUM
        T = [[1, 0, 0], [0, 1, 0], [0, 0, 1]]
        U, S, V = self.svd22([A[0][0], A[0][1], A[1][0], A[1][1]])
        T[0][0] = U[0] * V[0] + U[1] * V[2]
        T[0][1] = U[0] * V[1] + U[1] * V[3]
        T[1][0] = U[2] * V[0] + U[3] * V[2]
        T[1][1] = U[2] * V[1] + U[3] * V[3]
        scale = 1.0
        src_demean_mean = [0.0, 0.0]
        src_demean_var = [0.0, 0.0]
        for i in range(SRC_NUM):
            src_demean_mean[0] += src_demean[i][0]
            src_demean_mean[1] += src_demean[i][1]
        src_demean_mean[0] /= SRC_NUM
        src_demean_mean[1] /= SRC_NUM
        for i in range(SRC_NUM):
            src_demean_var[0] += (src_demean_mean[0] - src_demean[i][0]) * (src_demean_mean[0] - src_demean[i][0])
            src_demean_var[1] += (src_demean_mean[1] - src_demean[i][1]) * (src_demean_mean[1] - src_demean[i][1])
        src_demean_var[0] /= SRC_NUM
        src_demean_var[1] /= SRC_NUM
        scale = 1.0 / (src_demean_var[0] + src_demean_var[1]) * (S[0] + S[1])
        T[0][2] = dst_mean[0] - scale * (T[0][0] * src_mean[0] + T[0][1] * src_mean[1])
        T[1][2] = dst_mean[1] - scale * (T[1][0] * src_mean[0] + T[1][1] * src_mean[1])
        T[0][0] *= scale
        T[0][1] *= scale
        T[1][0] *= scale
        T[1][1] *= scale
        return T

    def get_affine_matrix(self,sparse_points):
        # 获取affine变换矩阵
        with ScopedTiming("get_affine_matrix", self.debug_mode > 1):
            # 使用Umeyama算法计算仿射变换矩阵
            matrix_dst = self.image_umeyama_112(sparse_points)
            matrix_dst = [matrix_dst[0][0],matrix_dst[0][1],matrix_dst[0][2],
                          matrix_dst[1][0],matrix_dst[1][1],matrix_dst[1][2]]
            return matrix_dst

# 人脸注册任务类
class FaceRegistration:
    def __init__(self,face_det_kmodel,face_reg_kmodel,det_input_size,reg_input_size,database_dir,anchors,confidence_threshold=0.25,nms_threshold=0.3,rgb888p_size=[1280,720],display_size=[1920,1080],debug_mode=0):
        # 人脸检测模型路径
        self.face_det_kmodel=face_det_kmodel
        # 人脸注册模型路径
        self.face_reg_kmodel=face_reg_kmodel
        # 人脸检测模型输入分辨率
        self.det_input_size=det_input_size
        # 人脸注册模型输入分辨率
        self.reg_input_size=reg_input_size
        self.database_dir=database_dir
        # anchors
        self.anchors=anchors
        # 置信度阈值
        self.confidence_threshold=confidence_threshold
        # nms阈值
        self.nms_threshold=nms_threshold
        # sensor给到AI的图像分辨率,宽16字节对齐
        self.rgb888p_size=[ALIGN_UP(rgb888p_size[0],16),rgb888p_size[1]]
        # 视频输出VO分辨率,宽16字节对齐
        self.display_size=[ALIGN_UP(display_size[0],16),display_size[1]]
        # debug_mode模式
        self.debug_mode=debug_mode
        self.face_det=FaceDetApp(self.face_det_kmodel,model_input_size=self.det_input_size,anchors=self.anchors,confidence_threshold=self.confidence_threshold,nms_threshold=self.nms_threshold,debug_mode=0)
        self.face_reg=FaceRegistrationApp(self.face_reg_kmodel,model_input_size=self.reg_input_size,rgb888p_size=self.rgb888p_size)

    # run函数
    def run(self,input_np,img_file):
        self.face_det.config_preprocess(input_image_size=[input_np.shape[3],input_np.shape[2]])
        det_boxes,landms=self.face_det.run(input_np)
        if det_boxes:
            if det_boxes.shape[0] == 1:
                # 若是只检测到一张人脸,则将该人脸注册到数据库
                db_i_name = img_file.split('.')[0]
                for landm in landms:
                    self.face_reg.config_preprocess(landm,input_image_size=[input_np.shape[3],input_np.shape[2]])
                    reg_result = self.face_reg.run(input_np)
                    with open(self.database_dir+'{}.bin'.format(db_i_name), "wb") as file:
                        file.write(reg_result.tobytes())
                        print('Success!')
            else:
                print('Only one person in a picture when you sign up')
        else:
            print('No person detected')

    def image2rgb888array(self,img):   #4维
        # 将Image转换为rgb888格式
        with ScopedTiming("fr_kpu_deinit",self.debug_mode > 0):
            img_data_rgb888=img.to_rgb888()
            # hwc,rgb888
            img_hwc=img_data_rgb888.to_numpy_ref()
            shape=img_hwc.shape
            img_tmp = img_hwc.reshape((shape[0] * shape[1], shape[2]))
            img_tmp_trans = img_tmp.transpose()
            img_res=img_tmp_trans.copy()
            # chw,rgb888
            img_return=img_res.reshape((1,shape[2],shape[0],shape[1]))
        return  img_return


if __name__=="__main__":
    # 人脸检测模型路径
    face_det_kmodel_path="/sdcard/examples/kmodel/face_detection_320.kmodel"
    # 人脸注册模型路径
    face_reg_kmodel_path="/sdcard/examples/kmodel/face_recognition.kmodel"
    # 其它参数
    anchors_path="/sdcard/examples/utils/prior_data_320.bin"
    database_dir="/sdcard/examples/utils/db/"               # 人脸信息注册数据存放路径
    database_img_dir="/sdcard/examples/utils/db_img/"       # 需要注册的人脸图片存放位置
    face_det_input_size=[320,320]
    face_reg_input_size=[112,112]
    confidence_threshold=0.5
    nms_threshold=0.2
    anchor_len=4200
    det_dim=4
    anchors = np.fromfile(anchors_path, dtype=np.float)
    anchors = anchors.reshape((anchor_len,det_dim))
    max_register_face = 100              #数据库最多人脸个数
    feature_num = 128                    #人脸识别特征维度

    fr=FaceRegistration(face_det_kmodel_path,face_reg_kmodel_path,det_input_size=face_det_input_size,reg_input_size=face_reg_input_size,database_dir=database_dir,anchors=anchors,confidence_threshold=confidence_threshold,nms_threshold=nms_threshold)
    try:
        # 获取图像列表
        img_list = os.listdir(database_img_dir)
        for img_file in img_list:
            #本地读取一张图像
            full_img_file = database_img_dir + img_file
            print(full_img_file)
            img = image.Image(full_img_file)
            img.compress_for_ide()
            # 转rgb888的chw格式
            rgb888p_img_ndarry = fr.image2rgb888array(img)
            # 人脸注册
            fr.run(rgb888p_img_ndarry,img_file)
            gc.collect()
    except Exception as e:
        sys.print_exception(e)
    finally:
        fr.face_det.deinit()
        fr.face_reg.deinit()
保存并运行程序。
注册的人脸特征信息以 bin 文件的形式存放于注册人脸数据库 /sdcard/examples/utils/db/ 文件夹。
人脸识别
打开 CanMV IDE 软件,新建文件并添加如下代码
from libs.PipeLine import PipeLine, ScopedTiming
from libs.AIBase import AIBase
from libs.AI2D import Ai2d
import os
import ujson
from media.media import *
from media.sensor import *
from time import *
import nncase_runtime as nn
import ulab.numpy as np
import time
import image
import aidemo
import random
import gc
import sys
import math

# 自定义人脸检测任务类
class FaceDetApp(AIBase):
    def __init__(self,kmodel_path,model_input_size,anchors,confidence_threshold=0.25,nms_threshold=0.3,rgb888p_size=[1920,1080],display_size=[1920,1080],debug_mode=0):
        super().__init__(kmodel_path,model_input_size,rgb888p_size,debug_mode)
        # kmodel路径
        self.kmodel_path=kmodel_path
        # 检测模型输入分辨率
        self.model_input_size=model_input_size
        # 置信度阈值
        self.confidence_threshold=confidence_threshold
        # nms阈值
        self.nms_threshold=nms_threshold
        self.anchors=anchors
        # sensor给到AI的图像分辨率,宽16字节对齐
        self.rgb888p_size=[ALIGN_UP(rgb888p_size[0],16),rgb888p_size[1]]
        # 视频输出VO分辨率,宽16字节对齐
        self.display_size=[ALIGN_UP(display_size[0],16),display_size[1]]
        # debug模式
        self.debug_mode=debug_mode
        # 实例化Ai2d,用于实现模型预处理
        self.ai2d=Ai2d(debug_mode)
        # 设置Ai2d的输入输出格式和类型
        self.ai2d.set_ai2d_dtype(nn.ai2d_format.NCHW_FMT,nn.ai2d_format.NCHW_FMT,np.uint8, np.uint8)

    # 配置预处理操作,这里使用了pad和resize,Ai2d支持crop/shift/pad/resize/affine,具体代码请打开/sdcard/app/libs/AI2D.py查看
    def config_preprocess(self,input_image_size=None):
        with ScopedTiming("set preprocess config",self.debug_mode > 0):
            # 初始化ai2d预处理配置,默认为sensor给到AI的尺寸,可以通过设置input_image_size自行修改输入尺寸
            ai2d_input_size=input_image_size if input_image_size else self.rgb888p_size
            # 计算padding参数,并设置padding预处理
            self.ai2d.pad(self.get_pad_param(), 0, [104,117,123])
            # 设置resize预处理
            self.ai2d.resize(nn.interp_method.tf_bilinear, nn.interp_mode.half_pixel)
            # 构建预处理流程,参数为预处理输入tensor的shape和预处理输出的tensor的shape
            self.ai2d.build([1,3,ai2d_input_size[1],ai2d_input_size[0]],[1,3,self.model_input_size[1],self.model_input_size[0]])

    # 自定义后处理,results是模型输出的array列表,这里使用了aidemo库的face_det_post_process接口
    def postprocess(self,results):
        with ScopedTiming("postprocess",self.debug_mode > 0):
            res = aidemo.face_det_post_process(self.confidence_threshold,self.nms_threshold,self.model_input_size[0],self.anchors,self.rgb888p_size,results)
            if len(res)==0:
                return res,res
            else:
                return res[0],res[1]

    def get_pad_param(self):
        dst_w = self.model_input_size[0]
        dst_h = self.model_input_size[1]
        # 计算最小的缩放比例,等比例缩放
        ratio_w = dst_w / self.rgb888p_size[0]
        ratio_h = dst_h / self.rgb888p_size[1]
        if ratio_w < ratio_h:
            ratio = ratio_w
        else:
            ratio = ratio_h
        new_w = (int)(ratio * self.rgb888p_size[0])
        new_h = (int)(ratio * self.rgb888p_size[1])
        dw = (dst_w - new_w) / 2
        dh = (dst_h - new_h) / 2
        top = (int)(round(0))
        bottom = (int)(round(dh * 2 + 0.1))
        left = (int)(round(0))
        right = (int)(round(dw * 2 - 0.1))
        return [0,0,0,0,top, bottom, left, right]

# 自定义人脸注册任务类
class FaceRegistrationApp(AIBase):
    def __init__(self,kmodel_path,model_input_size,rgb888p_size=[1920,1080],display_size=[1920,1080],debug_mode=0):
        super().__init__(kmodel_path,model_input_size,rgb888p_size,debug_mode)
        # kmodel路径
        self.kmodel_path=kmodel_path
        # 检测模型输入分辨率
        self.model_input_size=model_input_size
        # sensor给到AI的图像分辨率,宽16字节对齐
        self.rgb888p_size=[ALIGN_UP(rgb888p_size[0],16),rgb888p_size[1]]
        # 视频输出VO分辨率,宽16字节对齐
        self.display_size=[ALIGN_UP(display_size[0],16),display_size[1]]
        # debug模式
        self.debug_mode=debug_mode
        # 标准5官
        self.umeyama_args_112 = [
            38.2946 , 51.6963 ,
            73.5318 , 51.5014 ,
            56.0252 , 71.7366 ,
            41.5493 , 92.3655 ,
            70.7299 , 92.2041
        ]
        self.ai2d=Ai2d(debug_mode)
        self.ai2d.set_ai2d_dtype(nn.ai2d_format.NCHW_FMT,nn.ai2d_format.NCHW_FMT,np.uint8, np.uint8)

    # 配置预处理操作,这里使用了affine,Ai2d支持crop/shift/pad/resize/affine,具体代码请打开/sdcard/app/libs/AI2D.py查看
    def config_preprocess(self,landm,input_image_size=None):
        with ScopedTiming("set preprocess config",self.debug_mode > 0):
            ai2d_input_size=input_image_size if input_image_size else self.rgb888p_size
            # 计算affine矩阵,并设置仿射变换预处理
            affine_matrix = self.get_affine_matrix(landm)
            self.ai2d.affine(nn.interp_method.cv2_bilinear,0, 0, 127, 1,affine_matrix)
            # 构建预处理流程,参数为预处理输入tensor的shape和预处理输出的tensor的shape
            self.ai2d.build([1,3,ai2d_input_size[1],ai2d_input_size[0]],[1,3,self.model_input_size[1],self.model_input_size[0]])

    # 自定义后处理
    def postprocess(self,results):
        with ScopedTiming("postprocess",self.debug_mode > 0):
            return results[0][0]

    def svd22(self,a):
        # svd
        s = [0.0, 0.0]
        u = [0.0, 0.0, 0.0, 0.0]
        v = [0.0, 0.0, 0.0, 0.0]
        s[0] = (math.sqrt((a[0] - a[3]) ** 2 + (a[1] + a[2]) ** 2) + math.sqrt((a[0] + a[3]) ** 2 + (a[1] - a[2]) ** 2)) / 2
        s[1] = abs(s[0] - math.sqrt((a[0] - a[3]) ** 2 + (a[1] + a[2]) ** 2))
        v[2] = math.sin((math.atan2(2 * (a[0] * a[1] + a[2] * a[3]), a[0] ** 2 - a[1] ** 2 + a[2] ** 2 - a[3] ** 2)) / 2) if \
        s[0] > s[1] else 0
        v[0] = math.sqrt(1 - v[2] ** 2)
        v[1] = -v[2]
        v[3] = v[0]
        u[0] = -(a[0] * v[0] + a[1] * v[2]) / s[0] if s[0] != 0 else 1
        u[2] = -(a[2] * v[0] + a[3] * v[2]) / s[0] if s[0] != 0 else 0
        u[1] = (a[0] * v[1] + a[1] * v[3]) / s[1] if s[1] != 0 else -u[2]
        u[3] = (a[2] * v[1] + a[3] * v[3]) / s[1] if s[1] != 0 else u[0]
        v[0] = -v[0]
        v[2] = -v[2]
        return u, s, v

    def image_umeyama_112(self,src):
        # 使用Umeyama算法计算仿射变换矩阵
        SRC_NUM = 5
        SRC_DIM = 2
        src_mean = [0.0, 0.0]
        dst_mean = [0.0, 0.0]
        for i in range(0,SRC_NUM * 2,2):
            src_mean[0] += src[i]
            src_mean[1] += src[i + 1]
            dst_mean[0] += self.umeyama_args_112[i]
            dst_mean[1] += self.umeyama_args_112[i + 1]
        src_mean[0] /= SRC_NUM
        src_mean[1] /= SRC_NUM
        dst_mean[0] /= SRC_NUM
        dst_mean[1] /= SRC_NUM
        src_demean = [[0.0, 0.0] for _ in range(SRC_NUM)]
        dst_demean = [[0.0, 0.0] for _ in range(SRC_NUM)]
        for i in range(SRC_NUM):
            src_demean[i][0] = src[2 * i] - src_mean[0]
            src_demean[i][1] = src[2 * i + 1] - src_mean[1]
            dst_demean[i][0] = self.umeyama_args_112[2 * i] - dst_mean[0]
            dst_demean[i][1] = self.umeyama_args_112[2 * i + 1] - dst_mean[1]
        A = [[0.0, 0.0], [0.0, 0.0]]
        for i in range(SRC_DIM):
            for k in range(SRC_DIM):
                for j in range(SRC_NUM):
                    A[i][k] += dst_demean[j][i] * src_demean[j][k]
                A[i][k] /= SRC_NUM
        T = [[1, 0, 0], [0, 1, 0], [0, 0, 1]]
        U, S, V = self.svd22([A[0][0], A[0][1], A[1][0], A[1][1]])
        T[0][0] = U[0] * V[0] + U[1] * V[2]
        T[0][1] = U[0] * V[1] + U[1] * V[3]
        T[1][0] = U[2] * V[0] + U[3] * V[2]
        T[1][1] = U[2] * V[1] + U[3] * V[3]
        scale = 1.0
        src_demean_mean = [0.0, 0.0]
        src_demean_var = [0.0, 0.0]
        for i in range(SRC_NUM):
            src_demean_mean[0] += src_demean[i][0]
            src_demean_mean[1] += src_demean[i][1]
        src_demean_mean[0] /= SRC_NUM
        src_demean_mean[1] /= SRC_NUM
        for i in range(SRC_NUM):
            src_demean_var[0] += (src_demean_mean[0] - src_demean[i][0]) * (src_demean_mean[0] - src_demean[i][0])
            src_demean_var[1] += (src_demean_mean[1] - src_demean[i][1]) * (src_demean_mean[1] - src_demean[i][1])
        src_demean_var[0] /= SRC_NUM
        src_demean_var[1] /= SRC_NUM
        scale = 1.0 / (src_demean_var[0] + src_demean_var[1]) * (S[0] + S[1])
        T[0][2] = dst_mean[0] - scale * (T[0][0] * src_mean[0] + T[0][1] * src_mean[1])
        T[1][2] = dst_mean[1] - scale * (T[1][0] * src_mean[0] + T[1][1] * src_mean[1])
        T[0][0] *= scale
        T[0][1] *= scale
        T[1][0] *= scale
        T[1][1] *= scale
        return T

    def get_affine_matrix(self,sparse_points):
        # 获取affine变换矩阵
        with ScopedTiming("get_affine_matrix", self.debug_mode > 1):
            # 使用Umeyama算法计算仿射变换矩阵
            matrix_dst = self.image_umeyama_112(sparse_points)
            matrix_dst = [matrix_dst[0][0],matrix_dst[0][1],matrix_dst[0][2],
                          matrix_dst[1][0],matrix_dst[1][1],matrix_dst[1][2]]
            return matrix_dst

# 人脸识别任务类
class FaceRecognition:
    def __init__(self,face_det_kmodel,face_reg_kmodel,det_input_size,reg_input_size,database_dir,anchors,confidence_threshold=0.25,nms_threshold=0.3,face_recognition_threshold=0.75,rgb888p_size=[1280,720],display_size=[1920,1080],debug_mode=0):
        # 人脸检测模型路径
        self.face_det_kmodel=face_det_kmodel
        # 人脸识别模型路径
        self.face_reg_kmodel=face_reg_kmodel
        # 人脸检测模型输入分辨率
        self.det_input_size=det_input_size
        # 人脸识别模型输入分辨率
        self.reg_input_size=reg_input_size
        self.database_dir=database_dir
        # anchors
        self.anchors=anchors
        # 置信度阈值
        self.confidence_threshold=confidence_threshold
        # nms阈值
        self.nms_threshold=nms_threshold
        self.face_recognition_threshold=face_recognition_threshold
        # sensor给到AI的图像分辨率,宽16字节对齐
        self.rgb888p_size=[ALIGN_UP(rgb888p_size[0],16),rgb888p_size[1]]
        # 视频输出VO分辨率,宽16字节对齐
        self.display_size=[ALIGN_UP(display_size[0],16),display_size[1]]
        # debug_mode模式
        self.debug_mode=debug_mode
        self.max_register_face = 100                  # 数据库最多人脸个数
        self.feature_num = 128                        # 人脸识别特征维度
        self.valid_register_face = 0                  # 已注册人脸数
        self.db_name= []
        self.db_data= []
        self.face_det=FaceDetApp(self.face_det_kmodel,model_input_size=self.det_input_size,anchors=self.anchors,confidence_threshold=self.confidence_threshold,nms_threshold=self.nms_threshold,rgb888p_size=self.rgb888p_size,display_size=self.display_size,debug_mode=0)
        self.face_reg=FaceRegistrationApp(self.face_reg_kmodel,model_input_size=self.reg_input_size,rgb888p_size=self.rgb888p_size,display_size=self.display_size)
        self.face_det.config_preprocess()
        # 人脸数据库初始化
        self.database_init()

    # run函数
    def run(self,input_np):
        # 执行人脸检测
        det_boxes,landms=self.face_det.run(input_np)
        recg_res = []
        for landm in landms:
            # 针对每个人脸五官点,推理得到人脸特征,并计算特征在数据库中相似度
            self.face_reg.config_preprocess(landm)
            feature=self.face_reg.run(input_np)
            res = self.database_search(feature)
            recg_res.append(res)
        return det_boxes,recg_res

    def database_init(self):
        # 数据初始化,构建数据库人名列表和数据库特征列表
        with ScopedTiming("database_init", self.debug_mode > 1):
            db_file_list = os.listdir(self.database_dir)
            for db_file in db_file_list:
                if not db_file.endswith('.bin'):
                    continue
                if self.valid_register_face >= self.max_register_face:
                    break
                valid_index = self.valid_register_face
                full_db_file = self.database_dir + db_file
                with open(full_db_file, 'rb') as f:
                    data = f.read()
                feature = np.frombuffer(data, dtype=np.float)
                self.db_data.append(feature)
                name = db_file.split('.')[0]
                self.db_name.append(name)
                self.valid_register_face += 1

    def database_reset(self):
        # 数据库清空
        with ScopedTiming("database_reset", self.debug_mode > 1):
            print("database clearing...")
            self.db_name = []
            self.db_data = []
            self.valid_register_face = 0
            print("database clear Done!")

    def database_search(self,feature):
        # 数据库查询
        with ScopedTiming("database_search", self.debug_mode > 1):
            v_id = -1
            v_score_max = 0.0
            # 将当前人脸特征归一化
            feature /= np.linalg.norm(feature)
            # 遍历当前人脸数据库,统计最高得分
            for i in range(self.valid_register_face):
                db_feature = self.db_data[i]
                db_feature /= np.linalg.norm(db_feature)
                # 计算数据库特征与当前人脸特征相似度
                v_score = np.dot(feature, db_feature)/2 + 0.5
                if v_score > v_score_max:
                    v_score_max = v_score
                    v_id = i
            if v_id == -1:
                # 数据库中无人脸
                return 'unknown'
            elif v_score_max < self.face_recognition_threshold:
                # 小于人脸识别阈值,未识别
                return 'unknown'
            else:
                # 识别成功
                result = 'name: {}, score:{}'.format(self.db_name[v_id],v_score_max)
                return result

    # 绘制识别结果
    def draw_result(self,pl,dets,recg_results):
        pl.osd_img.clear()
        if dets:
            for i,det in enumerate(dets):
                # (1)画人脸框
                x1, y1, w, h = map(lambda x: int(round(x, 0)), det[:4])
                x1 = x1 * self.display_size[0]//self.rgb888p_size[0]
                y1 = y1 * self.display_size[1]//self.rgb888p_size[1]
                w =  w * self.display_size[0]//self.rgb888p_size[0]
                h = h * self.display_size[1]//self.rgb888p_size[1]
                pl.osd_img.draw_rectangle(x1,y1, w, h, color=(255,0, 0, 255), thickness = 4)
                # (2)写人脸识别结果
                recg_text = recg_results[i]
                pl.osd_img.draw_string_advanced(x1,y1,32,recg_text,color=(255, 255, 0, 0))


if __name__=="__main__":
    # 注意:执行人脸识别任务之前,需要先执行人脸注册任务进行人脸身份注册生成feature数据库
    # 显示模式,默认"lcd"
    display_mode="lcd"
    display_size=[640,480]
    # 人脸检测模型路径
    face_det_kmodel_path="/sdcard/examples/kmodel/face_detection_320.kmodel"
    # 人脸识别模型路径
    face_reg_kmodel_path="/sdcard/examples/kmodel/face_recognition.kmodel"
    # 其它参数
    anchors_path="/sdcard/examples/utils/prior_data_320.bin"
    database_dir ="/sdcard/examples/utils/db/"
    rgb888p_size=[1024,768]
    face_det_input_size=[320,320]
    face_reg_input_size=[112,112]
    confidence_threshold=0.5
    nms_threshold=0.2
    anchor_len=4200
    det_dim=4
    anchors = np.fromfile(anchors_path, dtype=np.float)
    anchors = anchors.reshape((anchor_len,det_dim))
    face_recognition_threshold = 0.75        # 人脸识别阈值

    # 初始化PipeLine,只关注传给AI的图像分辨率,显示的分辨率
    sensor = Sensor(width=1280, height=960) # 构建摄像头对象
    pl = PipeLine(rgb888p_size=rgb888p_size, display_size=display_size, display_mode=display_mode)
    pl.create(sensor=sensor)  # 创建PipeLine实例
    fr=FaceRecognition(face_det_kmodel_path,face_reg_kmodel_path,det_input_size=face_det_input_size,reg_input_size=face_reg_input_size,database_dir=database_dir,anchors=anchors,confidence_threshold=confidence_threshold,nms_threshold=nms_threshold,face_recognition_threshold=face_recognition_threshold,rgb888p_size=rgb888p_size,display_size=display_size)
    try:
        while True:
            os.exitpoint()
            with ScopedTiming("total", 1):
                img=pl.get_frame()                      # 获取当前帧
                det_boxes,recg_res=fr.run(img)          # 推理当前帧
#                print(det_boxes,recg_res)               # 打印结果
                fr.draw_result(pl,det_boxes,recg_res)   # 绘制推理结果
                pl.show_image()                         # 展示推理效果
                gc.collect()
    except Exception as e:
        sys.print_exception(e)
    finally:
        fr.face_det.deinit()
        fr.face_reg.deinit()
        pl.destroy()
保存代码。
效果
运行程序,LCD 显示摄像头实时画面与人脸识别结果(人脸检测框、姓名、置信度);
将摄像头对准目标人物,可快速准确地给出识别结果;
切换不同人物和场景,识别准确率较高;
更多人脸测试
流程图
在人脸识别和舵机驱动的基础上,搭建刷脸自动开门的智慧门禁系统。
打开 CanMV IDE 软件,新建文件并添加如下代码
from libs.PipeLine import PipeLine, ScopedTiming
# ... ... #
import _thread                          # 多线程同时运行
from machine import FPIOA, PWM          # PWM 驱动舵机

# 自定义人脸检测任务类
class FaceDetApp(AIBase):
    # ... ... #

# 自定义人脸注册任务类
class FaceRegistrationApp(AIBase):
    # ... ... #

# 人脸识别任务类
class FaceRecognition:
    # ... ... #

# ==================== 门禁舵机控制 ====================
door_busy = False                       # 舵机动作状态标志

def door_task(servo):
    """子线程:开门 → 保持 → 关门(不阻塞主循环)"""
    global door_busy
    if door_busy:
        return
    door_busy = True
    print("[DOOR] Open")
    servo.duty(DUTY_OPEN)               # 正转开门
    time.sleep(0.5)
    servo.duty(DUTY_STOP)               # 停止
    time.sleep(3)                       # 保持开门3秒
    print("[DOOR] Close")
    servo.duty(DUTY_CLOSE)              # 反转关门
    time.sleep(0.5)
    servo.duty(DUTY_STOP)               # 停止
    door_busy = False

# =========== 主程序 =================
if __name__=="__main__":
    display_mode="lcd"
    # ... ... #
    face_recognition_threshold = 0.75        # 人脸识别阈值

# ---------- 舵机初始化 ----------
    DUTY_OPEN  = 5.0        # 正转(开门)
    DUTY_CLOSE = 10.0       # 反转(关门)
    DUTY_STOP  = 7.5        # 停止

    fpioa = FPIOA()
    fpioa.set_function(25, FPIOA.PWM5)
    servo = PWM(5, 50, duty=DUTY_STOP, enable=True)
    print("Servo init OK")

    try:
        while True:
            os.exitpoint()
            with ScopedTiming("total", 1):
                img=pl.get_frame()                      # 获取当前帧
                det_boxes,recg_res=fr.run(img)          # 推理当前帧
                fr.draw_result(pl,det_boxes,recg_res)   # 绘制推理结果
                pl.show_image()                         # 展示推理效果
                gc.collect()
                # ---------- 门禁触发逻辑 ----------
                if det_boxes and not door_busy:
                    for res in recg_res:
                        if res != 'unknown':
                            _thread.start_new_thread(door_task, (servo,))
                            break
    except Exception as e:
        sys.print_exception(e)
    finally:
        fr.face_det.deinit()
        fr.face_reg.deinit()
        pl.destroy()
保存代码。
效果
运行程序,LCD 显示摄像头实时画面与人脸识别结果(人脸检测框、姓名、置信度);
当检测到目标人脸时,舵机转动,表明门已开启;等待人离开,舵机反方向旋转,门禁关闭。
总结
本文介绍了正点原子 K230D BOX 开发套件结合 PWM 舵机和人脸识别,实现智能门禁系统的项目设计,包括舵机驱动、人脸注册、人脸识别、流程图、关键代码、效果演示等,为相关产品在边缘AI视觉领域的快速开发和应用设计提供了参考。
本文转自媒体报道或网络平台,系作者个人立场或观点。我方转载仅为分享,不代表我方赞成或认同。若来源标注错误或侵犯了您的合法权益,请及时联系客服,我们作为中立的平台服务者将及时更正、删除或依法处理。






联系电话:
010-61853490
新闻投稿:
server@icviews.cn
商务合作:
business@icviews.cn
问题反馈:
19800315212(微信同号)


半导纵横公众号

半导纵横小程序